CNC Fenja M1000
+10
Ptitmickey
Hervé-34
Strib
nagut
Vincent1155
Jcb84
silky
dh42
Mac Givré
meles
14 participants
Page 3 sur 3
Page 3 sur 3 •  1, 2, 3
 Re: CNC Fenja M1000
Bonsoir !!
On ne dit rien mais on admire !
c'est vraiment de l'horlogerie suisse !!
Hervé
On ne dit rien mais on admire !
c'est vraiment de l'horlogerie suisse !!
Hervé
Hervé-34- complétement accro

- Messages : 4611
Date d'inscription : 07/07/2014
 Re: CNC Fenja M1000
Wow! C'est superbe.

Nicko- je prends du galon

- Messages : 78
Points : 90
Date d'inscription : 22/11/2017
Age : 47
Localisation : 77
 Re: CNC Fenja M1000
Bonsoir,
Superbe réalisation ... tout est réalisé avec amour ... c'est vraiment très très beau ... Félicitations !
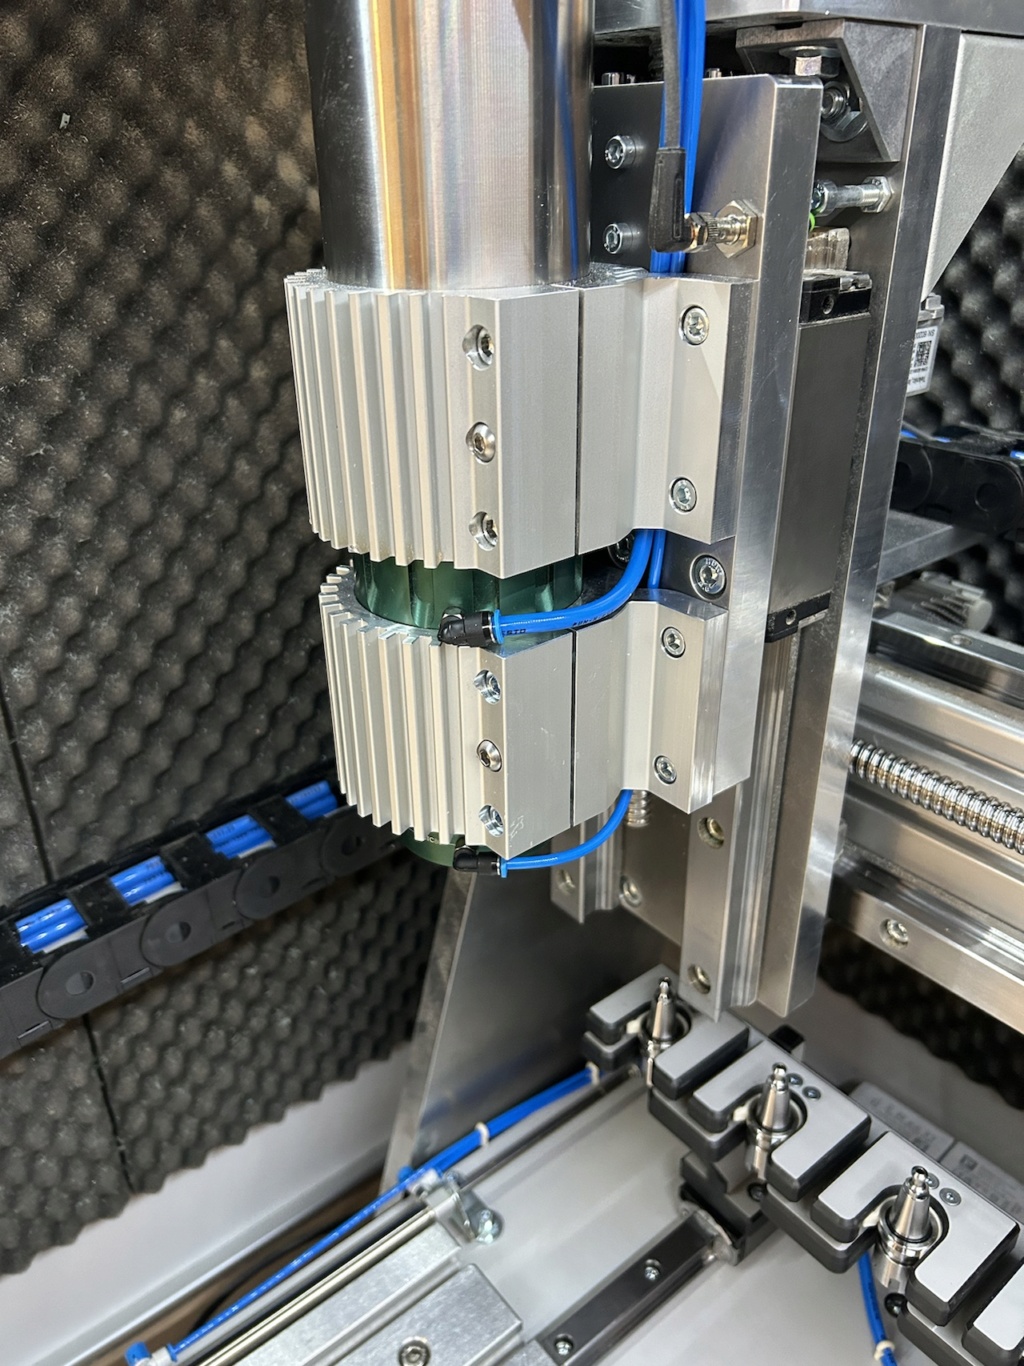
Je suis très intrigué par le système qui s'adapte sur la broche "classique" et qui permettra de gérer le changement "automatique" des outils : serait il possible d'en savoir un peu plus ? (achat ? réalisation maison ?)
Merci par avance et encore bravo.

Christophe38- je prends du galon

- Messages : 79
Points : 79
Date d'inscription : 02/09/2018
Age : 48
Localisation : 38
 Re: CNC Fenja M1000
Christophe38 a écrit:Bonsoir,
Superbe réalisation ... tout est réalisé avec amour ... c'est vraiment très très beau ... Félicitations !
Je suis très intrigué par le système qui s'adapte sur la broche "classique" et qui permettra de gérer le changement "automatique" des outils : serait il possible d'en savoir un peu plus ? (achat ? réalisation maison ?)
Merci par avance et encore bravo.
Merci pour ton message.
Le système de changement d'outil qui s'adapte sur la broche est celui-ci :.
https://www.spindel-shop.de/en/stc-tool-change-adapters/tool-change-adapters/Air-Cooled-HF-Spindles--HF-Spindle--HF-Spindles--HF-Spindle--HF-Spindles--Motorspindle--Milling-Spindle--Grinding-Spindle-22-365-458-459-482.html
 Re: CNC Fenja M1000
On m'a demandé des informations sur l'indicateur de fonctionnement du circuit de refroidissement.
J'ai utilisé cette référence :
https://shop.alphacool.com/en/shop/controllers-and-sensors/flow-indicator/17350-alphacool-eisfluegel-flow-indicator-g1/4-square-acetal
J'ai utilisé cette référence :
https://shop.alphacool.com/en/shop/controllers-and-sensors/flow-indicator/17350-alphacool-eisfluegel-flow-indicator-g1/4-square-acetal
 Re: CNC Fenja M1000
bonjour,
avec quels outils usines-tu les plaques en HPL pour éviter les éclats, et quels sont les conditions de coupe que tu utilises?
merci
silky
avec quels outils usines-tu les plaques en HPL pour éviter les éclats, et quels sont les conditions de coupe que tu utilises?
merci
silky

silky- complétement accro

- Messages : 634
Points : 766
Date d'inscription : 08/10/2013
Age : 69
Localisation : arras
 Re: CNC Fenja M1000
bonjour,
un grand bravo pour l'ensemble, c'est vraiment superbe !!!
Merci d'avoir mis tes paramètres pour l'hpl, peux tu indiquer l'épaisseur de passe pour ces paramètres ?
d'avance merci
un grand bravo pour l'ensemble, c'est vraiment superbe !!!
Merci d'avoir mis tes paramètres pour l'hpl, peux tu indiquer l'épaisseur de passe pour ces paramètres ?
d'avance merci

sweex59- très actif

- Messages : 338
Points : 455
Date d'inscription : 27/11/2011
Localisation : premesques (59)
 Re: CNC Fenja M1000
sweex59 a écrit:bonjour,
un grand bravo pour l'ensemble, c'est vraiment superbe !!!
Merci d'avoir mis tes paramètres pour l'hpl, peux tu indiquer l'épaisseur de passe pour ces paramètres ?
d'avance merci
Merci pour ton message.
En règle général je fais des passe avec une profondeur équivalente à la moitié du diamètre de l'outil.
Comme la vitesse d'avance est plutôt rapide, je préserve ainsi la mécanique ;-)
 Re: CNC Fenja M1000
Quelque lignes de code et la moitié de la macro est déjà faite ;-)
Il me reste à coder la prise d'outil.
Merci Eding CNC pour le travail déjà fait et pour la documentation !
Il me reste à coder la prise d'outil.
Merci Eding CNC pour le travail déjà fait et pour la documentation !
 Re: CNC Fenja M1000
Salut,

++
David
++
David
_________________
Traduction Française de CamBam et de sa documentation.
 Re: CNC Fenja M1000
Ptitmickey a écrit:sweex59 a écrit:bonjour,
un grand bravo pour l'ensemble, c'est vraiment superbe !!!
Merci d'avoir mis tes paramètres pour l'hpl, peux tu indiquer l'épaisseur de passe pour ces paramètres ?
d'avance merci
Merci pour ton message.
En règle général je fais des passe avec une profondeur équivalente à la moitié du diamètre de l'outil.
Comme la vitesse d'avance est plutôt rapide, je préserve ainsi la mécanique ;-)
merci bcp pour la réponse et encore bravo , c'est un régal de voir ça

sweex59- très actif

- Messages : 338
Points : 455
Date d'inscription : 27/11/2011
Localisation : premesques (59)
 Re: CNC Fenja M1000
J'utilise cet outil :
https://grt-tools.com/en/hpl-cutter-en
bonjour,
je leur ai demandé une demande de prix et je n'ai toujours pas eu de réponse!
silky
https://grt-tools.com/en/hpl-cutter-en
bonjour,
je leur ai demandé une demande de prix et je n'ai toujours pas eu de réponse!
silky

silky- complétement accro

- Messages : 634
Points : 766
Date d'inscription : 08/10/2013
Age : 69
Localisation : arras
 Re: CNC Fenja M1000
silky a écrit:J'utilise cet outil :
https://grt-tools.com/en/hpl-cutter-en
bonjour,
je leur ai demandé une demande de prix et je n'ai toujours pas eu de réponse!
silky
Je me souviens qu'ils avaient mis 2 semaines à me répondre ;-)
As-tu eu des nouvelles dans l'intervalle ?
 Re: CNC Fenja M1000
silky a écrit:J'utilise cet outil :
https://grt-tools.com/en/hpl-cutter-en
bonjour,
je leur ai demandé une demande de prix et je n'ai toujours pas eu de réponse!
silky
En demandant une OFFRE de prix , peut être aurais tu eu une réponse??

jcl- complétement accro

- Messages : 2360
Points : 3125
Date d'inscription : 03/03/2013
Age : 73
Localisation : belgique
 Re: CNC Fenja M1000
Bonjour à tous,
Je sèche sur un petit détail au niveau logiciel.
Les macros du changement d'outils fonctionnent correctement :
La macro de mesure de la longueur d'outil fonctionne aussi correctement :
Mais je souhaiterais maintenant qu'après la mesure de l'outil et les valeurs stockées dans la table des outils, la valeur Z zéro de la pièce se situe au niveau du marty.
C'est-à-dire que connaissant la hauteur de mon palpeur d'outil depuis le martyr et la longueur d'outil mesurée depuis le palpeur, le système devrait être capable d'ajuster la valeur Z zéro de la pièce à usiner.
Mais je comprends pas comment placer cette valeur et dans quelle variable...
Au plaisir de vous lire, je vous souhaite une belle journée.
Nicolas
Je sèche sur un petit détail au niveau logiciel.
Les macros du changement d'outils fonctionnent correctement :
- Code:
;This example shows how to make your own tool_changer work.
;It is made for 6 tools
;First current tool is dropped, then the new tool is picked
;There is a check whether selected tool is already in the spindle
;Also a check that the tool is within 1-6
;There is a picktool subroutine for each tool and a droptool subroutine for each tool.
;These routines need to be modified to fit your machine and tool changer

sub change_tool
    ;Switch off guard for tool change area collision
    TCAGuard off

    ;Check ZHeight comp and switch off when on, remember the state in #5019
    ;#5151 indicates that ZHeight comp is on
    #5019 = #5151
    if [#5019 == 1]
        ZHC off
    endif

   ;Switch off spindle
    m5

    ;Use #5015 to indicate succesfull toolchange
    #5015 = 0 ; Tool change not performed

    ; check tool in spindle and exit sub
    If [ [#5011] <> [#5008] ]
        if [[#5011] > 7 ]
            errmsg "Please select a tool from 1 to 7."
        else
            ;Drop current tool
            If [[#5008] == 0]
                GoSub DropTool0
            endif
            If [[#5008] == 1]
                GoSub DropTool1
            endif
            If [[#5008] == 2]
                GoSub DropTool2
            endif
            If [[#5008] == 3]
                GoSub DropTool3
            endif
            If [[#5008] == 4]
                GoSub DropTool4
            endif
            If [[#5008] == 5]
                GoSub DropTool5
            endif
            If [[#5008] == 6]
                GoSub DropTool6
            endif
            If [[#5008] == 7]
                GoSub DropTool7
            endif

            ;Pick new tool
            if [[#5011] == 0]
                GoSub PickTool0
            endif
            if [[#5011] == 1]
                GoSub PickTool1
            endif
            if [[#5011] == 2]
                GoSub PickTool2
            endif
            if [[#5011] == 3]
                GoSub PickTool3
            endif
            if [[#5011] == 4]
                GoSub PickTool4
            endif
            if [[#5011] == 5]
                GoSub PickTool5
            endif
            if [[#5011] == 6]
                GoSub PickTool6
            endif
            if [[#5011] == 7]
                GoSub PickTool7
            endif

        endif
    else
        msg "Tool already in spindle"
        #5015 = 1 ;indicate tool change performed
    endif

    If [[#5015] == 1]
        msg "Tool "#5008" Replaced by tool "#5011" G43 switched on"
        m6t[#5011]

        if [#5011 <> 0]
            G43  ;we use tool-length compensation.
        else
            G49  ;tool length compensation off for tool 0.
        endif
    else
        errmsg "tool change failed"
    endif

    ;Set default motion type to G1
    g1

    ;Switch on guard for tool change area collision
    TCAGuard on

    ;Check if ZHeight comp was on before and switch ON again if it was.
    if [#5019 == 1]
        ZHC on
    endif

EndSub

;* --- START CUSTOM ---

;Drop tool subroutines
Sub DropTool0
    ;Tool 0 is nothing, we could open the tool
    ;magazine here if needed for the following PickTool
    msg "Dropping tool 0"
endsub

Sub DropTool1
    msg "Dropping tool 1"
        g0 g53 z#4909   ; Z to safe height
      g0 g53 x#4900 y#4901   ; XY to tool 1 position
      g0 g53 z#4908   ; Z to tool position
      m54 p103
      m55 p103
      g4 p2 ;Wait 2 second
      m54 p102
      g4 p1 ;Wait 1 second
      g0 g53 z#4909 ; Z to safe height
      m55 p102
      m54 p104
      m55 p104
endsub

Sub DropTool2
    msg "Dropping tool 2"
        g0 g53 z#4909   ; Z to safe height
      g0 g53 x#4900 y#4902   ; XY to tool 1 position
      g0 g53 z#4908   ; Z to tool position
      m54 p103
      m55 p103
      g4 p2 ;Wait 2 second
      m54 p102
      g4 p1 ;Wait 1 second
      g0 g53 z#4909 ; Z to safe height
      m55 p102
      m54 p104
      m55 p104
endsub

Sub DropTool3
    msg "Dropping tool 3"
        g0 g53 z#4909   ; Z to safe height
      g0 g53 x#4900 y#4903   ; XY to tool 1 position
      g0 g53 z#4908   ; Z to tool position
      m54 p103
      m55 p103
      g4 p2 ;Wait 2 second
      m54 p102
      g4 p1 ;Wait 1 second
      g0 g53 z#4909 ; Z to safe height
      m55 p102
      m54 p104
      m55 p104
endsub

Sub DropTool4
    msg "Dropping tool 4"
        g0 g53 z#4909   ; Z to safe height
      g0 g53 x#4900 y#4904   ; XY to tool 1 position
      g0 g53 z#4908   ; Z to tool position
      m54 p103
      m55 p103
      g4 p2 ;Wait 2 second
      m54 p102
      g4 p1 ;Wait 1 second
      g0 g53 z#4909 ; Z to safe height
      m55 p102
      m54 p104
      m55 p104
endsub

Sub DropTool5
    msg "Dropping tool 5"
        g0 g53 z#4909   ; Z to safe height
      g0 g53 x#4900 y#4905   ; XY to tool 1 position
      g0 g53 z#4908   ; Z to tool position
      m54 p103
      m55 p103
      g4 p2 ;Wait 2 second
      m54 p102
      g4 p1 ;Wait 1 second
      g0 g53 z#4909 ; Z to safe height
      m55 p102
      m54 p104
      m55 p104
endsub

Sub DropTool6
    msg "Dropping tool 6"
        g0 g53 z#4909   ; Z to safe height
      g0 g53 x#4900 y#4906   ; XY to tool 1 position
      g0 g53 z#4908   ; Z to tool position
      m54 p103
      m55 p103
      g4 p2 ;Wait 2 second
      m54 p102
      g4 p1 ;Wait 1 second
      g0 g53 z#4909 ; Z to safe height
      m55 p102
      m54 p104
      m55 p104
endsub

Sub DropTool7
    msg "Dropping tool 7"
        g0 g53 z#4909   ; Z to safe height
      g0 g53 x#4900 y#4907   ; XY to tool 1 position
      g0 g53 z#4908   ; Z to tool position
      m54 p103
      m55 p103
      g4 p2 ;Wait 2 second
      m54 p102
      g4 p1 ;Wait 1 second
      g0 g53 z#4909 ; Z to safe height
      m55 p102
      m54 p104
      m55 p104
endsub


;Pick tool subroutines
Sub PickTool0
    msg "Picking tool 0"
    ;Tool 0 is nothing, so we just close the
    ;tool magazine here if needed.
    #5015 = 1 ; toolchange succes
endsub

Sub PickTool1
    msg "Picking tool 1"
        g0 g53 z#4909   ; Z to safe height
      g0 g53 x#4900 y#4901   ; XY to tool 1 position
      m54 p103
      m55 p103
      g4 p2 ;Wait 2 second
      m54 p102
      m54 p101
      g0 g53 z#4908   ; Z to tool position
      g4 p1 ;Wait 1 second
      m55 p102
      m55 p101
      g4 p1 ;Wait 1 second
      m54 p104
      m55 p104
      g4 p1 ;Wait 1 second
      g0 g53 z#4909 ; Z to safe height
    #5015 = 1 ; toolchange succes
endsub

Sub PickTool2
    msg "Picking tool 2"
        g0 g53 z#4909   ; Z to safe height
      g0 g53 x#4900 y#4902   ; XY to tool 1 position
      m54 p103
      m55 p103
      g4 p2 ;Wait 2 second
      m54 p102
      m54 p101
      g0 g53 z#4908   ; Z to tool position
      g4 p1 ;Wait 1 second
      m55 p102
      m55 p101
      g4 p1 ;Wait 1 second
      m54 p104
      m55 p104
      g4 p1 ;Wait 1 second
      g0 g53 z#4909 ; Z to safe height
    #5015 = 1 ; Tool change succes
endsub

Sub PickTool3
    msg "Picking tool 3"
        g0 g53 z#4909   ; Z to safe height
      g0 g53 x#4900 y#4903   ; XY to tool 1 position
      m54 p103
      m55 p103
      g4 p2 ;Wait 2 second
      m54 p102
      m54 p101
      g0 g53 z#4908   ; Z to tool position
      g4 p1 ;Wait 1 second
      m55 p102
      m55 p101
      g4 p1 ;Wait 1 second
      m54 p104
      m55 p104
      g4 p1 ;Wait 1 second
      g0 g53 z#4909 ; Z to safe height
    #5015 = 1 ; Tool change succes
endsub

Sub PickTool4
    msg "Picking tool 4"
        g0 g53 z#4909   ; Z to safe height
      g0 g53 x#4900 y#4904   ; XY to tool 1 position
      m54 p103
      m55 p103
      g4 p2 ;Wait 2 second
      m54 p102
      m54 p101
      g0 g53 z#4908   ; Z to tool position
      g4 p1 ;Wait 1 second
      m55 p102
      m55 p101
      g4 p1 ;Wait 1 second
      m54 p104
      m55 p104
      g4 p1 ;Wait 1 second
      g0 g53 z#4909 ; Z to safe height
    #5015 = 1 ; Tool change succes
endsub

Sub PickTool5
    msg "Picking tool 5"
        g0 g53 z#4909   ; Z to safe height
      g0 g53 x#4900 y#4905   ; XY to tool 1 position
      m54 p103
      m55 p103
      g4 p2 ;Wait 2 second
      m54 p102
      m54 p101
      g0 g53 z#4908   ; Z to tool position
      g4 p1 ;Wait 1 second
      m55 p102
      m55 p101
      g4 p1 ;Wait 1 second
      m54 p104
      m55 p104
      g4 p1 ;Wait 1 second
      g0 g53 z#4909 ; Z to safe height
    #5015 = 1 ; toolchange succes
endsub

Sub PickTool6
    msg "Picking tool 6"
        g0 g53 z#4909   ; Z to safe height
      g0 g53 x#4900 y#4906   ; XY to tool 1 position
      m54 p103
      m55 p103
      g4 p2 ;Wait 2 second
      m54 p102
      m54 p101
      g0 g53 z#4908   ; Z to tool position
      g4 p1 ;Wait 1 second
      m55 p102
      m55 p101
      g4 p1 ;Wait 1 second
      m54 p104
      m55 p104
      g4 p1 ;Wait 1 second
      g0 g53 z#4909 ; Z to safe height
    #5015 = 1 ; Tool change succes
endsub

Sub PickTool7
    msg "Picking tool 7"
        g0 g53 z#4909   ; Z to safe height
      g0 g53 x#4900 y#4907   ; XY to tool 1 position
      m54 p103
      m55 p103
      g4 p2 ;Wait 2 second
      m54 p102
      m54 p101
      g0 g53 z#4908   ; Z to tool position
      g4 p1 ;Wait 1 second
      m55 p102
      m55 p101
      g4 p1 ;Wait 1 second
      m54 p104
      m55 p104
      g4 p1 ;Wait 1 second
      g0 g53 z#4909 ; Z to safe height
    #5015 = 1 ; Tool change succes
endsub
La macro de mesure de la longueur d'outil fonctionne aussi correctement :
- Code:
sub m_tool
    if [[#5380==0] and [#5397==0]] ;do this only when not simulating and not rendering
        ;Check if toolsetter is calibrated
        if [[#4996 == 0] and [#4997 == 0] and [#4998 == 0] and [#4999 == 0]]
            errmsg "calibrate first, MDI: gosub calibrate_tool_setter"
        else
            g0 g53 z#4996 ; move to safe z
            dlgmsg "enter tool dimensions" "tool number" 5016 "approx tool length" 5017 "tool diameter" 5018
            ;Check user pressed OK
            if [#5398 == 1]
                if [[#5016 < 1] OR [#5016 > 99]]
                    ErrMsg "Tool must be in range of 0 .. 99"
                endif

                ;move to toolsetter coordinates
                g00 g53 x#4997 y#4998
                ;move to 10mm above chuck height + approx tool length + 10
                g00 g53 z[#4999+10+#5017]
                ;measure tool length and pull 5mm back up
                g38.2 g91 z-20 f30
                g90
                ;back to safe height
                g0 g53 z#4996
                ;Store tool length, diameter in tool table
                ;but only if actually measured,
                ;so leave tool table as is while rendering
                if [#5397 == 0]
                    #[5400 + #5016] = [#5053-#4999]
                    #[5500 + #5016] = #5018
                    #[5600 + #5016] = 0 ;Tool X offset is 0
                    msg "tool length measured="#[5400 + #5016]" stored at tool "#5016
                endif
            endif
        endif
    endif
endsub
Mais je souhaiterais maintenant qu'après la mesure de l'outil et les valeurs stockées dans la table des outils, la valeur Z zéro de la pièce se situe au niveau du marty.
C'est-à-dire que connaissant la hauteur de mon palpeur d'outil depuis le martyr et la longueur d'outil mesurée depuis le palpeur, le système devrait être capable d'ajuster la valeur Z zéro de la pièce à usiner.
Mais je comprends pas comment placer cette valeur et dans quelle variable...
Au plaisir de vous lire, je vous souhaite une belle journée.
Nicolas
 Re: CNC Fenja M1000
Bonjour à tous,
Maintenant que les macros de changement d'outils sont fonctionnelles, j'essaie de configurer une mesure d'outil après chaque prise d'outil sur un palpeur à position fixe.
Mais je rencontre plusieurs difficultés dans la macro Eding CNC.
La macro que je souhaiterais utiliser pour mesurer l'outil est la suivante :
Elle est censée aller lire les informations dans la table des outils.
Lorsque j'exécute la commande M6T1, l'outil 1 est bien sélectionné et les variables sont correctement renseignées :
#5008 (numéro d'outil)
#5009 (rayon d'outil)
#5010 (longueur d'outil)

Lorsque j'exécute la macro m_tool_no_dlg, Eding me retourne une erreur :
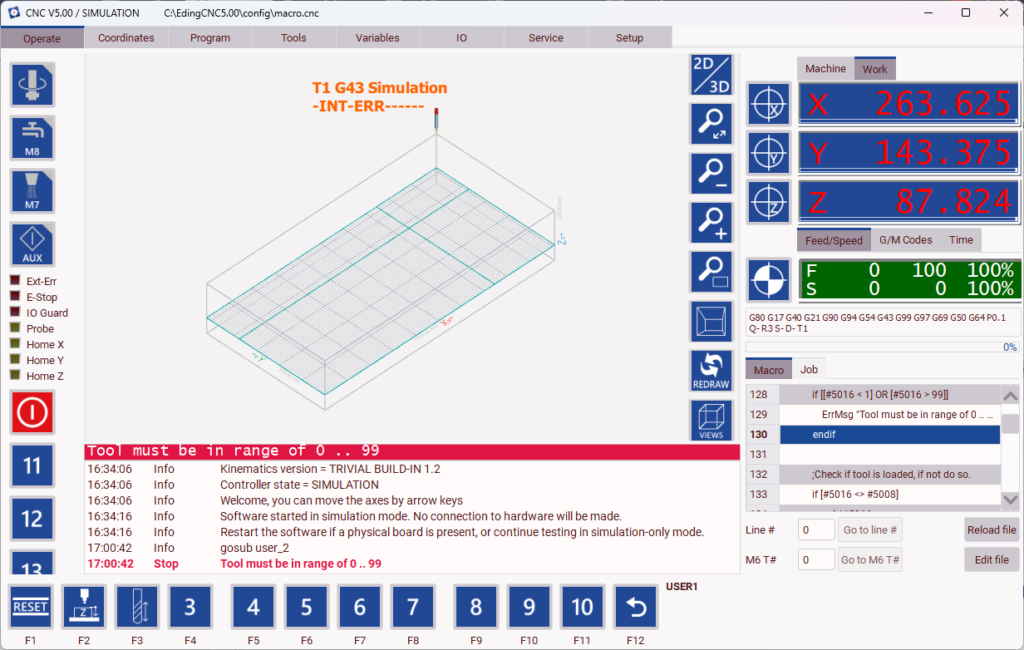
Pourtant l'outil 1 est bien actif, mais je ne comprends pas cette partie du code qui semble mettre en raltion la variable #5016 et #5025.
C'est précisément cette ligne de code qui me renvoie l'erreur :
Et je je regarde les variables, je vois clairement que les variables #5016 et #5025 ne sont pas renseignées.
Seule la variable #5008 contient le numéro d'outil.

Maintenant que les macros de changement d'outils sont fonctionnelles, j'essaie de configurer une mesure d'outil après chaque prise d'outil sur un palpeur à position fixe.
Mais je rencontre plusieurs difficultés dans la macro Eding CNC.
La macro que je souhaiterais utiliser pour mesurer l'outil est la suivante :
Elle est censée aller lire les informations dans la table des outils.
- Code:
;Same but no dialog
;Tool number is set in 5025
;Tool length an diameter is retrieved from tool table.
;Warning the length in the tool table must not be 10 mm or more shorter as the tool,
;Otherwise collision with the tool-setter will happen!!!!!!!
sub m_tool_no_dlg
    ;if [[#5380==0] and [#5397==0]] ;do this only when not simulating and not rendering
        ;Check if toolsetter is calibrated
        if [[#4996 == 0] and [#4997 == 0] and [#4998 == 0] and [#4999 == 0]]
            errmsg "calibrate first, MDI: gosub calibrate_tool_setter"
        else

            ;dlgmsg "enter tool dimensions" "tool number" 5016 "approx tool length" 5017 "tool diameter" 5018

            ;In stead of the dialog we get the values from the tool table.
            #5016 = #5025           ;Tool number
            #5017 = #[5400 + #5016] ;Approx tool-length from tool table
            #5018 = #[5500 + #5016] ;Tool diameter from tool table

            if [[#5016 < 1] OR [#5016 > 99]]
                ErrMsg "Tool must be in range of 0 .. 99"
            endif

            ;Check if tool is loaded, if not do so.
            if [#5016 <> #5008]
                m6 t#5016
            endif

            g0 g53 z#4996 ; move to safe z
            ;move to toolsetter coordinates
            g00 g53 x#4997 y#4998
            ;move to 10mm above chuck height + approx tool length + 10
            g00 g53 z[#4999+10+#5017]; change this to g00 g53 z[#5113] to go fully up.
            ;measure tool length and pull 5mm back up
            g38.2 g91 z-20 f30
            g90
            ;back to safe height
            g0 g53 z#4996
            ;Store tool length, diameter in tool table
            ;but only if actually measured,
            ;so leave tool table as is while rendering
            if [#5397 == 0]
                #[5400 + #5016] = [#5053-#4999]
                #[5500 + #5016] = #5018
                #[5600 + #5016] = 0 ;Tool X offset is 0
                msg "tool length measured="#[5400 + #5016]" stored at tool "#5016
            endif
        endif
    ;endif
endsub
Lorsque j'exécute la commande M6T1, l'outil 1 est bien sélectionné et les variables sont correctement renseignées :
#5008 (numéro d'outil)
#5009 (rayon d'outil)
#5010 (longueur d'outil)

Lorsque j'exécute la macro m_tool_no_dlg, Eding me retourne une erreur :

Pourtant l'outil 1 est bien actif, mais je ne comprends pas cette partie du code qui semble mettre en raltion la variable #5016 et #5025.
- Code:
;Same but no dialog
;Tool number is set in 5025
;Tool length an diameter is retrieved from tool table.
;Warning the length in the tool table must not be 10 mm or more shorter as the tool,
;Otherwise collision with the tool-setter will happen!!!!!!!
sub m_tool_no_dlg
    ;if [[#5380==0] and [#5397==0]] ;do this only when not simulating and not rendering
        ;Check if toolsetter is calibrated
        if [[#4996 == 0] and [#4997 == 0] and [#4998 == 0] and [#4999 == 0]]
            errmsg "calibrate first, MDI: gosub calibrate_tool_setter"
        else

            ;dlgmsg "enter tool dimensions" "tool number" 5016 "approx tool length" 5017 "tool diameter" 5018

            ;In stead of the dialog we get the values from the tool table.
            #5016 = #5025           ;Tool number
            #5017 = #[5400 + #5016] ;Approx tool-length from tool table
            #5018 = #[5500 + #5016] ;Tool diameter from tool table
C'est précisément cette ligne de code qui me renvoie l'erreur :
- Code:
if [[#5016 < 1] OR [#5016 > 99]]
                ErrMsg "Tool must be in range of 0 .. 99"
            endif
Et je je regarde les variables, je vois clairement que les variables #5016 et #5025 ne sont pas renseignées.
Seule la variable #5008 contient le numéro d'outil.

 Re: CNC Fenja M1000
Salut,
Apparemment #5016 prends la valeur de #5025 (#5016 = #5025 ;Tool number)
Sur la doc, page 182, on a une macro qui semble être faite pour renseigner la valeur de #5025, je ne comprends pas trop son utilité, mais il semble que ce soit elle qui renseigne cette valeur.
Bon, j'enfonce peut être une porte ouverte ..
++
David
Et je je regarde les variables, je vois clairement que les variables #5016 et #5025 ne sont pas renseignées.
Apparemment #5016 prends la valeur de #5025 (#5016 = #5025 ;Tool number)
Sur la doc, page 182, on a une macro qui semble être faite pour renseigner la valeur de #5025, je ne comprends pas trop son utilité, mais il semble que ce soit elle qui renseigne cette valeur.
- Code:
sub measure_used_tools
   GetToolInfo num 5025 ;
   Msg "number of tools used = " #5025
   ;Note that 5025 is used as tool number in m_tool_no_dlg above.
   GetToolInfo first 5025
   while [#5025 <> -1]
      gosub m_tool_no_dlg ;
      msg "Tool "#5025" is measured"
      GetToolInfo next 5025
   endwhile
endsub
Bon, j'enfonce peut être une porte ouverte ..
++
David
_________________
Traduction Française de CamBam et de sa documentation.
 Re: CNC Fenja M1000
Salut,
la classe !!
++
David
la classe !!
++
David
_________________
Traduction Française de CamBam et de sa documentation.
Page 3 sur 3 •  1, 2, 3
Page 3 sur 3
Permission de ce forum:
Vous ne pouvez pas répondre aux sujets dans ce forum


